When explaining something, it is crucial to:
- Regulate the flow of information
- Direct attention
It’s also important to give your explanations a sense of narrative flow, that you’ve mapped it out and thought hard about where you are going to end up and how you are going to get there. It’s my opinion that the best way to do this is by starting from a blank canvas, and gradually building up a series of diagrams or notes to illustrate and elucidate the point you are trying to make. For more on the basic idea:
- Check out my video for researchEd home here which covers the basic theory behind my approach
- Check out this post for a couple of examples of how I do it in the classroom
- Get a copy of my new book which is aimed mostly at science, but has 114 pages looking at the nuts and bolts of effective explanations
I often get asked how I go about doing it in a technical sense – what physical equipment do teachers need in order to use this technique and start from a blank canvas? People have a range of budgets and needs, so in this post I am going to provide an overview of a few different ways to carry out this kind of teaching, and conclude by briefly outlining what I do.
I’m going to look at five different set-ups:
- Simple whiteboards
- Smartboard
- Visualisers
- Graphics tablets
- 2-in-1 laptops
Any questions, just let me know.
Simple whiteboards
Whiteboards are the simplest and easiest way to do blank canvassing. You get a pen – be it bullet or chisel – and get writing. Simple and effective.

They are also very durable. A good board, well looked after, should theoretically last for a very long time. Unfortunately, they do tend to get ruined by overcleaning, cleaning with dodgy products, scratching or people (idiots) writing on them with permanent markers.
Importantly, most classrooms already have a whiteboard so it doesn’t involve you having to go spending any money. Some classrooms don’t have one because they have a smartboard instead (see below) and others have one way off to the side of the room, but it’s always going to be cheaper to ask the site team to reconfigure your room a bit than to pay for some fancy gear. So if budget is a big issue: stick with what you’ve got.
If you are going to go with a simple whiteboard, the best set-up in my opinion is to have as big a board as you can (or multiple boards) covering up the front wall of your room as much as possible, and have a projector beaming onto those boards. That way you can draw or write as much as you like, keep a lot of it there and visible for the students and you can project pictures or texts or whatever and annotate them with ease. All in all, a solid choice.
Smartboards
A smartboard is a large, interactive screen. When they first came in, people used specific software with them that was fairly horrific, and left you quite limited in what you could do. Calibration was a nightmare, and the pen used to jog and jitter all over the place, and you then suffered the indignity of trying to tap moving targets on the board to get the pen working again whilst your year 9s politely waited in silence (or laughed hysterically and cheered every time you hit a target [lesson: ruined]). They were also, and still are, extremely expensive, with basic models starting at around £1500 and rising to over £5000 for more advanced ones. I’ve personally never really got on with these types of board because I think there are better solutions that are a lot cheaper (see below), but theoretically they can fulfil any of your blank canvassing needs.
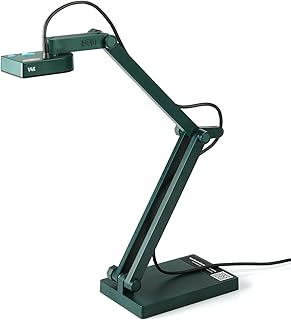
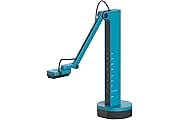
Visualisers
A visualiser is, at root, a camera on a stick, pointing down. They have become extremely popular recently for a number of reasons:
- You can point your camera at a mini-whiteboard or a notebook and use that as your blank canvas (which is what I do in the video linked at the top of the page)
- You can take pictures of your work as you go for later use
- You can quickly and easily put students’ work underneath your visualiser for live marking and whole class feedback
- You can put a text under the visualiser for annotation
- You can conduct a practical demonstration under a visualiser
- You are always facing the class (unlike with a whiteboard)
- You can sit down (unlike with a whiteboard)
- You can be offset to the board so you aren’t blocking it (unlike with a whiteboard unless you have enormously long arms)
- You don’t get shoulder ache from writing on a whiteboard
Visualisers are an excellent piece of kit, but there are a lot on the market, with an accompanying large range of features and prices. I’ve used a bunch of different brands and will now only recommend IPEVO due to the quality of their product. I’ve used three different types of IPEVO visualiser and always been impressed by the build quality, camera quality, versatility and accompanying software. A quick round-up:
IPEVO V4K
This is the cheapest IPEVO visualiser, and you can get it for £100. It’s lightweight but sturdy, has a microphone, good quality camera and basic features like autofocus and contrast control. It’s an excellent starter visualiser and will fulfil almost all your visualising needs.
IPEVO V4K PRO

I got my hands on one of these recently and was very impressed. It looks very similar to the V4K (but it’s black and orange, so cooler), and carries two additional features: first, it has a light on it, which is really important for teachers. Cameras need light (because physics) but often teachers will be in a relatively dim room. This is because they will often be in a classroom with a projector and a board, and as projectors get old and tired their brightness decreases, meaning teachers need to dim the lights in the room just so students can read what’s been projected onto the board. The V4K PRO light means that if you are writing on a non-reflective surface like paper you will get much better visual clarity even if your room is dark because you have a rubbish projector (new projector bulbs can cost £100 [I know, that’s mad]). It doesn’t work so well if you are writing on a mini-whiteboard, as you end up with a bright spot where the bulb is reflected off the board.
The second cool additional feature is the AI enhanced microphone. This is an enhancement to the microphone that cuts out background noise. I was pretty sceptical, so I tested it and rubbed my hands together underneath the camera, then started tapping a couple of feet away from it, and the camera did a very good job of blocking out that sound. I don’t know how directly useful this is for teachers who don’t regularly record videos, but it’s pretty cool anyway. The quality of the video recording is generally better than the V4K but again, not sure how many people would need this.
IPEVO VZ-X
OneNote – a quick pause
Before we get on to graphics tablets and laptops, it’s worth quickly explaining what OneNote is, why it’s awesome and why its existence makes graphics tablets and laptops seriously excellent for modelling and explanation.
OneNote is a Microsoft app that is basically a glorified notebook. You can have different sections and add different pages to your sections. You can type or write directly into those sections, as well as insert media like pictures, videos, a slide deck or even a booklet. That page can then be shared with an individual (who can then see and edit it) or a class (if you are set up with Microsoft Teams). Graphics tablets and 2-in-1 laptops allow you to digitally write onto your notebook, and the end of a unit might look something like this:
Reasons why this is fantastic:
- Effortless blank canvassing, but you retain everything so can go back
- Can zoom in and out
- Can change pen colour, thickness, use a ruler (which also gives angles), add shapes, use blank/ruled/squared paper
- Clarity is excellent
- Sharing capacity
- I have the app downloaded to my phone, so I can take pictures of students’ work which appears almost instantly on the board

It can do almost anything a visualiser can. The main exception is with the live annotation of a student’s work, where even though you can take pictures it’s a bit more clunky to do using OneNote and the image quality will be worse. Visualisers are also better if you are showing a practical method (science/technology/art) or if you are using physical manipulatives.
(Note there are two versions of OneNote, one is just called OneNote and the other is called OneNote for Windows 10, and is much better – both are included with a standard Microsoft account)
Graphics tablets
A graphics tablet is basically a rectangular surface that you can plug into a computer and write on. There are two main types:
Without screen

These tablets are very easy to use, and are just simple plug and play. Most computers will be able to use them without additional driver software, and they are quite cheap, ranging from £30-£60ish. I confess I have never actually used one, but I know a lot of people use them and find them to be very straightforward, though they can take a little time to get used to as you are not really looking at where the pen meets the tablet, but at what is happening on the computer’s screen (there’s a good review of them here).
With a screen
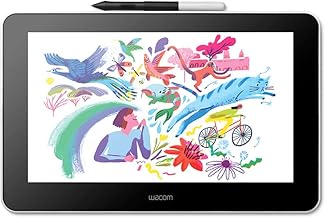
These tablets circumvent any issue you might have with getting used to using them. They are also meant for graphics designers, so the build quality is high and they are beautiful to write on. The screens are designed to feel like writing on paper, and they have just the right amount of resistance to help with penmanship. The pens are also generally of a superior quality and easy to grip and write with.
There are, however, two large drawbacks. First, price. I had a good hunt around and the cheapest one I could find with a decent screen size was a Huion 13 inch for £200. XP-Pen and Wacom are other respected brands, but weigh in at £300+ for comparable sizes and quality, which is obviously a prohibitive cost for many. Another problem is the way they connect to a computer or laptop: other than the most expensive models, most of these tablets require to plug in via a USB cable and an HDMI port. This is a problem because most classroom laptops or computers will only have one HDMI port, which will be plugged into your projector or screen. So unless you get an HDMI splitter (which can be temperamental) or have wireless casting to a projector then this might not be the right choice for you.
2-in-1 laptops
A 2-in-1 is basically a laptop and tablet hybrid. You can have the screen up and use it like a normal laptop, or you can flip it right the way over, and the laptop disables the keyboard and mousepad and you use it like a tablet instead.
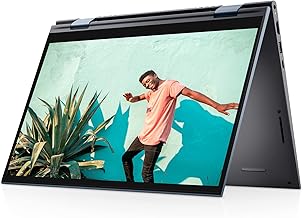
Some of these 2-in-1s have active screens that you can write directly onto. This is obviously an ideal solution, as it means you can circumvent the need for any other tech to plug into your main device, you just have one laptop that does everything you need from it. Unfortunately, as ever, price can be an issue, and it seems like you get what you pay for. I’ve tried three different 2-in-1s, a cheap (£300ish) Lenovo, a slightly less cheap (£400ish) HP and a more expensive Lenovo (£600ish) and you definitely get what you pay for. More expensive models are not only faster and more effective in their main use as laptops, but the screens are better quality and are easier to write on. I would not recommend the Lenovo I used, but the HP Pavilion x360 range one I tried is fine, just not perfect. The price does seem high, but if a school is buying these as part of its long term IT strategy then £600 should be within budget, as these devices should replace PCs and should last a very long time.
What do I do?
At work, we each have a Lenovo 2-in-1 laptop. I don’t know what their exact original price was, but it’s a very good piece of kit (there’s also no point telling you which model it is as they chop and change so often you probably can’t even get it anymore). My lab has an enormous TV screen – not an active board or anything, just a really big TV. I have a very large whiteboard next to the TV screen that I never use. My lab is very long – I have six rows of desks – and students can see fine from the back whether I have been writing or typing. I use OneNote for pretty much all of my teaching. It rocks, and I could definitely never go back to teaching without it.

December 3, 2021 at 12:37 am
Just a tip for when the idiots write on a whiteboard with permanent marker: color over the permanent marker with a dry-erase marker, then erase. Voila! No more permanent marker!
LikeLiked by 1 person
December 4, 2021 at 10:03 pm
I prefer my whiteboard generally. I also use a visualizer to show student handouts and strategically queued up images on my laptop to project when needed.
Disadvantages:
Back is to students frequently while writing on the board
Can’t save my notes. Have to erase and start over every period.
Advantages:
Perhaps this is a distinctly American attitude to teaching, but I feel like when I’m on my feet using my board, I have more “stage presence” that is able to hold student attention better.
LikeLiked by 1 person
December 5, 2021 at 7:49 pm
Thanks for this. Great read. A question from OneNote 2in1 user… You mention using your phone, with OneNote app, and screenshotting students’ work. What do you do with these screen shots? Is there a slick way to get them on or near to the area of where you are working? At!
LikeLike
December 5, 2021 at 8:16 pm
I just press on the notepad where i want it to go and there is an icon to take a picture!
LikeLike
December 6, 2021 at 7:05 am
I’m considering all options. At my last school I had a visualizer. The advantages I see that not only can I draw and project with it, but I can use it as a magnifier for fossils and rocks etc., but most importantly, for showing student work samples and answers.
LikeLike
December 15, 2021 at 9:27 pm
Hi, do you embed PowerPoints and video clips into your lessons. Or is literally all just you instructing the kids and annotating on One note? I use One note at the moment with sixth form but tend to use it with PowerPoint and worksheets embedded in individual lesson pages. I am interested in your way of doing it (and yes I have got your book to read over Christmas!). Simon
LikeLike
December 15, 2021 at 9:34 pm
No videos really. Just the boiklet and my models!
LikeLike