“Metacognition is specific to the task being undertaken and stronger where learners have a thorough grounding in subject knowledge…While some of the metacognitive strategies in this guidance can be described generically, they can only be improved through practice—and this means applying them to specific tasks.”
Metacognition is making it big at the moment. Following increased emphasis from the EEF, a number of people have been talking and writing about it. Dawn Cox wrote an excellent list of 5 simple ways to encourage metacognition in the classroom which you should definitely read. Blending with another more recent fashion, I wanted to write a more science-specific version with just a few simple ways to have your students think in a more “metacognitive” sense.
Effective metacognition is characterised as a cycle of planning, monitoring and evaluating. Planning is picking the correct cognitive strategy when approaching a problem or task, monitoring is checking your progress as you proceed through the task and evaluating is looking back on your process and assessing success. Each of the below techniques fit into one or more of these parts of the cycle.
- How do we get good at science?
Our department has an increased focus on Core Knowledge and long term retention. This is a big change for many of our students, and they don’t necessarily appreciate why it is happening. So we explicitly talk to them about how having fluency in the fundamental building blocks of science improves their scientific thinking, creativity and experience of the world around them.
This serves as a handy lead-in to effective study strategies which again, we explicitly teach. I will teach my students how to use their Core Questions to revise effectively or how to take advantage of the generation effect when preparing for assessments. We will then practice those techniques in class in advance of the students using them at home.
Metacognition: Effective study strategies fit within all three of planning, monitoring and evaluating (p, e and m). Students choose appropriate strategies (p), whilst they are working can easily monitor their progress (m) and then look back on their successes in mini-quizzes or assessments (e).
2. Why this is wrong
There are many opportunities to make your thinking explicit through “why this is wrong.” A common contender might be longer written answers, where you might dissect a student’s work using a visualiser. So I might look at overall structure, use of keywords and sufficient detail.
You can plan for this in advance as well using a worksheet which already has model answers. This is an example of a sheet with a “good” answer and a “poor” one. This gives you the opportunity to really compare the two and make the implicit explicit.
Metacognition: Teachers discussing wrong examples are exemplifying and modelling the process of evaluation and showing students the importance of critically appraising their work, rather than just finishing a problem and moving on. It is of course worth noting that this is all from within the framework of domain knowledge and not general “evaluative skills”.
3. Use of analogies
In science we cannot help but use analogies. New learning must be anchored into old learning especially when the material is abstract and conceptual. But all analogies are just approximations and at some point will fail to map over to the true concept. At this point, I like to be really clear about the limits of the analogy and why it fails to map over. However, the sequencing is important so as not to confuse. Embed and establish the concepts for which the analogy is effective and then, once those concepts have been properly mastered, start looking at where the analogy is ineffective.
Metacognition: Thinking beyond the analogy is evaluative, it looks both at the successes and failures of a given approach.
4. Explicit modelling diagram construction
This technique is described really nicely in Making Every Science Lesson Count. Essentially instead of just projecting a diagram onto the board, you draw it instead. But you start with only the briefest of outlines and then slowly build up, explaining what you are doing as you go.
This enables me to make explicit the implicit, reveal my thinking and how the whole is structured from the parts. I’ve put an example of how I do this at the bottom of the page.
Metacognition: this could probably fit within more than one strand, but for me it is actually a model of monitoring. When I go through a diagram like this I am talking aloud about my thought processes and the deliberate steps I am taking when undergoing my task.
5. Here’s the answer, show me how
According to Rosenshine’s Principles of Instruction students should be able to get about 80% of the work correct. However sometimes they don’t necessarily know if they are right or wrong, and can then embed mistakes. Often in numerical topics I will give students the correct answer and expect them to show all the correct working to get there. This allows them to monitor their steps and, if they are wrong, go back and really think about how to better proceed.
Metacognition: this fits with all three, but with an emphasis on evaluating and then planning. The student looks back on their work, evaluates if it is correct, then has to adapt and find a new route if they have failed to achieve the correct answer.
6. Step-by-steps
These are the bread and butter of science teachers. Whilst our students are learning a new topic they need step-by-step guides to approaching problems. The steps should be as simple as possible but also flexible. There is no good learning a step-by-step if it is so inflexible that if there are any slight deviations or distractors in the problem it cannot be effectively used.
Students always ask if they need to use the step-by-step and I insist that they do to begin with, even if they have got the hang of it pretty quickly. Knowing when to start allowing them more freedom is a tricky business as you don’t want the step-by-step to actually slow them down or hamper them. Generally I would verbally quiz them, see if they understand what they are doing and then let them go for it.
Metacognition: when students are first starting, the emphasis here is on monitoring, as I give them the step-by-step they need to solve the problem. As they become more expert, the work set for them shifts to being about which particular step-by-step they use to solve a given problem e.g. can they identify that this is a problem for which they need to work out reacting masses or limiting reactants or whatever. So it starts as about monitoring and then becomes about planning.
7. Why are we doing this/making links
Most of Secondary School Science links together. Teachers with masterful knowledge of all three taught disciplines can move seamlessly between them, drawing out links and teasing out commonalities. I’m nowhere near there yet, but I do try where possible to push things around a bit. So for example when talking about how we measure rates of reaction I will also discuss how we measure velocity, which is more or less the same maths. This enables me to uncover deep structure and start students thinking in a more joined up, metacognitive fashion about the topic.
For me this is also helpful for motivation and a sense of purpose, which are characteristics of the metacognitive learner. Seeing things as connected brings a sense of satisfaction, and often that “ohhhh” moment comes when two things have been linked together. For example, whenever I teach how the trigonal planar structure of carbonyls leads to formation of racemic mixtures, I am tying together a lot of knowledge that they know already, mechanisms generally, VSEPR theory and optical isomerism. There’s always a weirdly nerdy “oh that’s cool” moment from the class as I finish the mechanism on the board, a moment that makes no sense on the face of it. But if you appreciate the special type of joy that comes from seeing those links exposed it makes perfect sense.
There is a danger with the links though which is the worry of overdoing it. When teaching a new topic you want to be careful how much you link it to old topics as you will just end up overloading and confusing your students. So when first learning how to do bond energy calculations, don’t mention that this is why combustion reactions are exothermic or worse (as I once did) chuck in that “this is why alkanes are better fuels than alkenes if you just divide everything by two so you get one mole of fuel” (what was I thinking?). Those links are perfect for once the material has been learned, and should be only judiciously applied before that.
Metacognition: the emphasis here is on evaluation, on looking back at an acquired body of knowledge and attempting to see how the parts fit as a larger whole.
Many thanks to Alex Quigley for giving me a lot of feedback and helping me to better understand the metacognitive cycle.
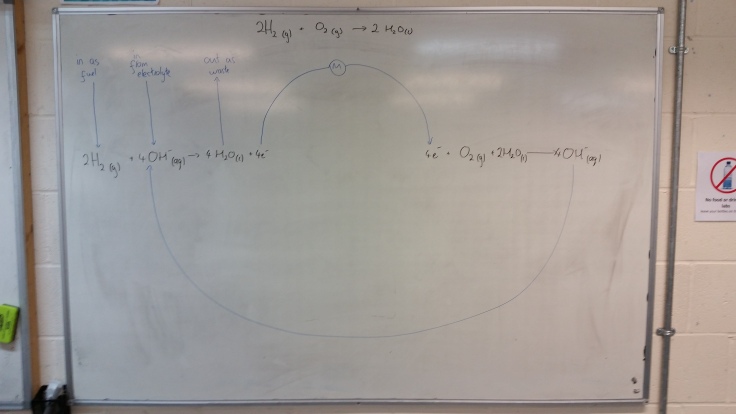
Addendum – building up a diagram:
When teaching fuel cells I used to beam the graphic below onto the board and talk through it.

Now, I slowly build it up instead. First, I set the scene with the big picture:

Next up, after briefly saying that we are dealing with a system with two electrodes and an electrolyte between them (they already know these terms well, so I don’t clutter the board with them):

Discussion of where the hydrogen and hydroxide come from and where the water goes to (technically two steps):

So where do these electrons go? Students already know from studying cells that they will hop over to the other electrode, carrying charge as they go:

Let’s balance that half equation on the RHS:

Which means I have to double the LHS as well in order to balance the electrons:

Point to the hydroxide product on the RHS, transfer it to the LHS:
And now I can see where that H2O on the RHS comes from as well, leaving just two as waste:

And then final step is to complete the picture by pointing out where the Oxygen came from (which should have been earlier but I forgot).
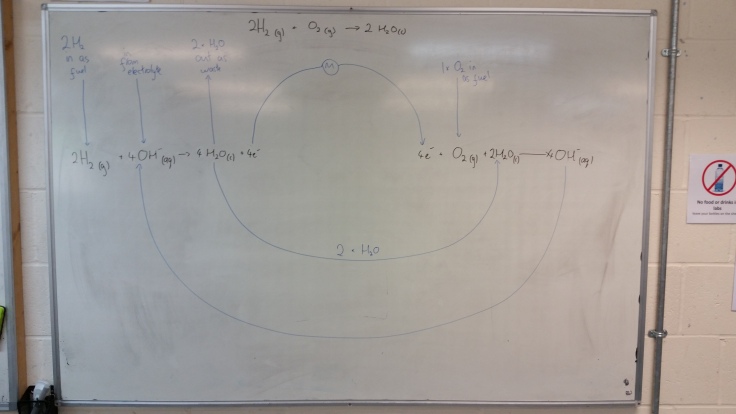
Picture is now complete: we understand where the reactants come from, where the products go, what happens to the electrolyte and how the motor gets its groove on. Bing, bang, bosh.

2 Pingback